Showing posts with label gift. Show all posts

Monday, July 09, 2012

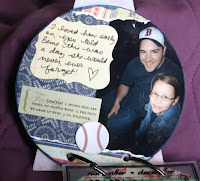
Red Sox Mini Album - A Gift for My Brother

My brother has done a ton of work on our house, from resealing toilets to hanging doors, and really wanted a special way to say thank you to him!  He is a huge baseball fan and luckily I was able to get some Red Sox tickets for a song!  We loved having a special night out with him, and then this album was the second part of his gift.  I'm posting a few pages to give a sense of the whole album.


I purchased the round, chipboard album and a 6 by 6 Authentique collection at the nearest local scrapbook store.  I also went to a local sports collectibles store to score some supplies.  The cover is made from printed packing tape - only $1 with purchase at the second store.  I used Stickles to jazz it up a bit.


I covered a couple pages completely with a photo.  My favorite place for processing is Costco, both for quality of prints and for price.  I was so touched that my brother made this such a special night for my daughter.  When he arrived he told her it was a night she would never forget.


Esme was really spoiled this evening - she got to try all kinds of Fenway snacks, plus Charles let her use his binoculars to watch the game and made sure to explain everything that happened as the night went on.    Using the collection of papers helped to make this a super fast and easy album.  I also used navy blue paint on the edges of every page for a cohesive look.


I tried to throw in some fun doo-dads to help document the night even if I didn't have photos of a particular event - Charles had given us the complete background story on, "Sweet Caroline," so I wanted to be sure that was included.  Even though we could see the game easily from our seats, it was hard to photograph the players so I included some baseball cards too.  I made sure to get the very common ones, so that my brother wouldn't be too concerned that there were holes punched through them.  


In additional to the red and blue patterned paper I threw in a fair amount of green and white, from baseball stickers to gingham ribbon, and even a bit of sparkly felt.  Esme doesn't realize how lucky she is, but because of Charles she actually go to go down on the field at Fenway Park!  I just gave Charles the album a couple weeks ago.  I new he liked it, because he proclaimed it a Home Run!


Saturday, December 03, 2011

Make Something Every Day: Day Three


Today I started a cowl-scarf for my Mother-in-Law.  She mentioned wanting one quite some time ago, so I started crocheting it while I sat on the bleachers at Esme's swim meet today.  I'd say I'm about half done so far.  I was super proud of Esme today!  Her breathing techniques have improved a lot and she brought her 25 yard freestyle down to by three seconds and her 50 yard freestyle down by almost four seconds.


Sunday, January 31, 2010


This is my new favorite personalized gift to give. I made my first magnet board a little over a year ago, but really stepped up production a couple weeks ago. I hate giving people (especially kids) the same kinds of gifts everyone else does. I made the first one for my bff's mom, who is very hard to shop for! Additionally, these are super inexpensive to make and don't take to long if you're in a pinch!

They start as pizza pans from the dollar store. The ones I buy are 12 inches, but this includes the lip on the edges. I start by using alcohol ink to color the lip. It is important to do this first as it can be messy otherwise. I made a template for the patterned paper by putting a piece of paper over the pan and rubbing around it with an embossing stylus. I trace around my template and then cut the circle out of a pieces of 12 by 12 scrapbooking paper. I use a heavy coat of Mod Podge all over the pan to adhere the paper, and smooth it out with a brayer and my fingers. A few little wrinkles are okay, but I don't like bubbles - it makes it harder for magnets to stick. I add a thin layer of Mod Podge on top of the patterned paper, and then a thick layer around the edges to adhere the buttons. I originally put the buttons on to hide the edge of the patterned paper and it's worked very well to help hide flaws as well. Other embellishments would work as well, like gems or maybe even Prima flowers. I've done names or words on these boards, and mostly used letter stickers with another layer of Mod Podge on top. You can see my first attempt here. I'm on the fence about whether I like the coordinating magnets made from page pebbles better or clip magnets, also from the dollar store. These two are for some little friends who are brother and sister, so I used coordinating papers that I thought they might like, and that would match their kitchen.

I have lots going on this week, but I have three more transparency, post-industrial scenes that I really want to finish and post!

Friday, January 08, 2010


I made this plaque as a shower gift for my sister-in-law when my niece was born. It made from foam core board covered with patterned paper and then elements Mod Podged on top. The fairy is made from felt and patterned paper with buttons for hands and stamped wings with Distress Stickles added to them. The face is an old picture of my grandmother, Chloe's great-grandmother. The gift box is a Clementine crate decoupaged with coordinated patterned paper. I can't believe my beautiful niece is almost one year old!